
Tutorial: Controlling RGB LED with Arduino and Xojo
Today we control an RGB-LED with Arduino and Xojo:
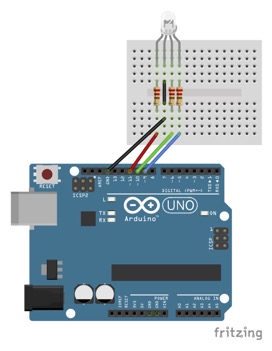
- First, you need to build the circuitry as shown in the picture below.
- Donwload the required Arduino and Xojo project files here (https://no516.com/dl/Control_RGB_Led.zip).
- Unzip the donwloaded project files.
- Connect the Arduino to your computer using an USB cable.
- Open the Arduino project file in the Arduino IDE and upload the project to the Arduino board.
- Open the Xojo project file and run the project in the Xojo IDE.
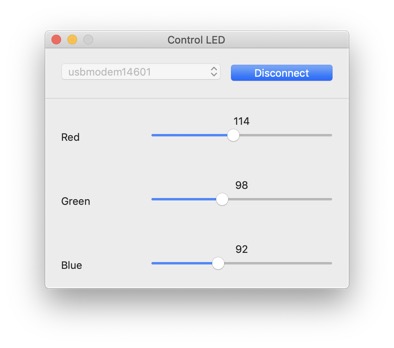
- When the application starts, you have to connect to correct the serial port (select the port from the popup menu and press the „Connect“ button)
- Now you can control the different colors of the RGB-LED with the three silders.
To control the RGB-LED we simply call the folowing code whenever one of the three sliders gets moved:
SerialController.Write("<"+ Str(Slider_Red.Value) + "," + Str(Slider_Green.Value) + "," + Str(Slider_Blue.Value) + ">")
Note that we use the “<“ and “>” symbols as start an end markers for the command that we send to the Arduino board. This is how the Arduino will know where a command begins and ends. The values of the sliders are separated by commas. On the Arduino board we use special code to parse the received message.
- First, you need to build the circuitry as shown in the picture below.
- Donwload the required Arduino and Xojo project files here (https://no516.com/dl/Control_RGB_Led.zip).
- Unzip the donwloaded project files.
- Connect the Arduino to your computer using an USB cable.
- Open the Arduino project file in the Arduino IDE and upload the project to the Arduino board.
- Open the Xojo project file and run the project in the Xojo IDE.
- When the application starts, you have to connect to correct the serial port (select the port from the popup menu and press the „Connect“ button)
- Now you can control the different colors of the RGB-LED with the three silders.
To control the RGB-LED we simply call the folowing code whenever one of the three sliders gets moved:
SerialController.Write("<"+ Str(Slider_Red.Value) + "," + Str(Slider_Green.Value) + "," + Str(Slider_Blue.Value) + ">")
Note that we use the “<“ and “>” symbols as start an end markers for the command that we send to the Arduino board. This is how the Arduino will know where a command begins and ends. The values of the sliders are separated by commas. On the Arduino board we use special code to parse the received message.