
Tutorial: Controlling LED with Arduino and Xojo
It is quite easy to contral 3 LEDs with Arduino and Xojo:
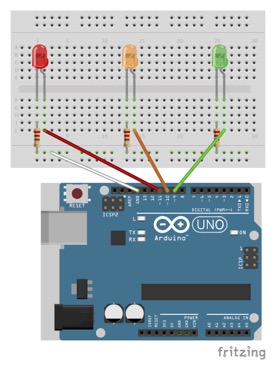
- First, you need to build the circuitry as shown in the picture below.
- Donwload the required Arduino and Xojo project files here (https://no516.com/dl/Control_Led.zip).
- Unzip the donwloaded project files.
- Connect the Arduino to your computer using an USB cable.
- Open the Arduino project file in the Arduino IDE and upload the project to the Arduino board.
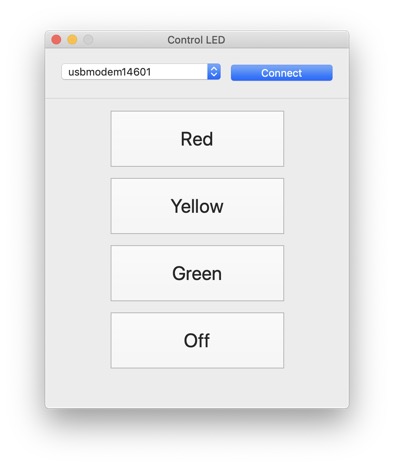
- Open the Xojo project file and run the project in the Xojo IDE.
- When the application starts, you have to connect to correct the serial port (select the port from the popup menu and press the „Connect“ button)
- Now you can enable the red, yellow and green LED (or turn them all off) by pressing the corresponding button.
To enable the red LED we simply need to put this code in the „Action“-event of the button with caption „RED“:
SerialController.Write("r")
This command will send a single character through the serial port to the Arduino board.
To enable the yellow or green LED we use:
SerialController.Write(“y”)
or
SerialController.Write(“g”)
To turn all three LEDs off, we send the chracter „o“:
SerialController.Write(“o”)
- First, you need to build the circuitry as shown in the picture below.
- Donwload the required Arduino and Xojo project files here (https://no516.com/dl/Control_Led.zip).
- Unzip the donwloaded project files.
- Connect the Arduino to your computer using an USB cable.
- Open the Arduino project file in the Arduino IDE and upload the project to the Arduino board.
- Open the Xojo project file and run the project in the Xojo IDE.
- When the application starts, you have to connect to correct the serial port (select the port from the popup menu and press the „Connect“ button)
- Now you can enable the red, yellow and green LED (or turn them all off) by pressing the corresponding button.
To enable the red LED we simply need to put this code in the „Action“-event of the button with caption „RED“:
SerialController.Write("r")
This command will send a single character through the serial port to the Arduino board.
To enable the yellow or green LED we use:
SerialController.Write(“y”)
or
SerialController.Write(“g”)
To turn all three LEDs off, we send the chracter „o“:
SerialController.Write(“o”)